Showing posts with label vintage fabric. Show all posts

Friday, 27 November 2015

Finish it Up Friday ...

How quickly are the weeks flying by?!!!  I have been really busy but not much to show on the sewing front this week.  A couple of little finishes and some finished articles in a larger project to share this week and to link up with Crazy Mom Quilts.
 
First up, these were some extra blocks I made for myself whilst I was making my first ever mini quilt for the Schnitzel & Boo swap over on instagram.  I finally had time to quilt and bind them into a mini which is now hanging on my studio wall!
 
 
I have not been happy with the binding on either of the minis which is strange because I can usually DO binding!  Will have to have a think about it and maybe practice before the next mini comes along.

This fabric Christmas Postcard is for another swap, this time a UK based Facebook group. 


It finished up at 7" x 5" and I have finally got to grips with how to do an edge on an ATC or postcard like this - hooray.  Just in time really because I have just signed up for the next ATC swap over at Very Berry Handmade.  The theme this time is Winter Comforts and luckily the posting deadline is not until the end of January.
 
And what has taken up most of my time are some costumes - 4 out of the 7 are now finished.  Can anyone guess what they are for?!!


 Once these are finished I can finally think about Christmas ........ advent calendars, presents, decorations and two quilts!!!!

Wednesday, 18 November 2015

WIP Wednesday - and there's lots of it!

So there has been some progress since last week ...... The pockets I had cut from the Advent Calendar panel have now all been attached and it is pinned to my design awaiting quilting.  I have a couple of ideas rumbling around my head for this .....
 

The tissue box blocks (as I call them!) have now been pieced together and are also waiting for quilting ....
 
 
And my other WIP from last week, which was my extra four blocks from my Schnitzel & Boo Mini Swap, are now finished and on my wall.  I think I will be linking that up to Finish It Up Friday!
 
Being loaded up on my frame this morning is yet another Project Linus top.  This was hiding in the bottom of the bag so it was kind of a surprise to find it!
 

And three others already to go with backing and batting cut to size ....
 
 
There is another Advent Calendar on my ironing board.  My youngest daughter assured me she was going to make this herself but with 30 November fast approaching she politely asked me yesterday whether I could make it for her!
 

And then there is something completely new and completely different ....


Old clothes + dye + curtain fabric = ????
 
Can you guess what it might be? 
All will be revealed over the next couple of weeks - the deadline for this project is 04 December!! x
 
Going to be linking up to Sew Fresh Quilts and Freshly Pieced today.


Thursday, 29 October 2015

Dog Gone Cute ta-da!!!!

Finally it's my turn at the Blog Hop run by Lorna over at Sew Fresh Designs.  When I first saw her Dog Gone Cute blocks I thought they were adorable and when a Quilt Along and Blog Hop were mentioned I jumped straight in.  This is my first time participating in a blog hop so please be gentle!
 
Well what can I say about the blocks and patterns?  Sooooo much and I have soooo many pictures that I don't know where to start.
 
The pattern was a dream to work with, once you got your head around all the pieces involved!!  In an attempt to be organised and efficient (that's my engineering background coming out) I set up a production line ........  I quickly reverted to making one block at a time because I found I was just using the quick unpick too much. 
 
The blocks were made using a stitch and flip method which I had never tried before.  Note - please do follow the pattern designer's instruction - sometimes they just happen to know what they are talking about ...... Let's just say that I didn't believe in ever ironing seams open before I made this block .... now I believe that ironing seams open has it's place - especially for precision on stitch and flip blocks!  I loved seeing the dog emerging from all the pieces ....


The blocks come in two sizes but I actually only ever made the smaller size.  I decided to use the blocks for a quilt for my daughter's upcoming birthday.  She had previously requested a quilt in blues and pinks so that's what I worked on.  She had no idea I was making it for her birthday and the secret sewing in a studio with the door closed was very different to how I normally work.  But then again I don't usually make a quilt in under three weeks!

I knew I didn't have the patience time to make a quilt solely made up of these blocks so I used some plain patches as filler and then decided to put my daughter's name on the side.  I liked the stitch and flip method so much I designed letters using this technique.


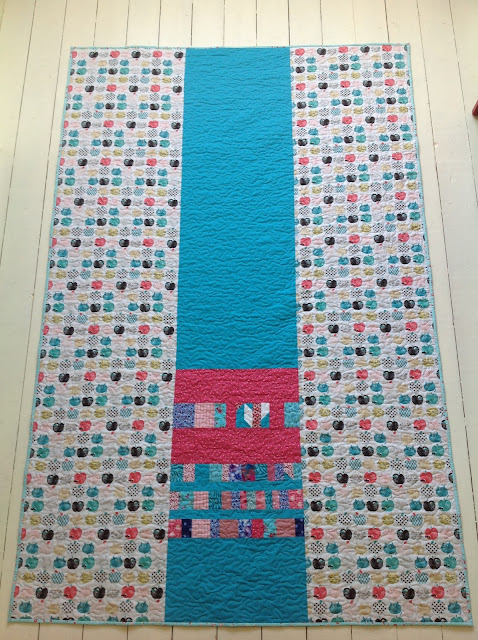
I had the backing already on my shelf but when I went to get some more fabric for the border (I went to get blue but came back with pink!) I saw the most adorable fabric with cats on and knew my daughter would fall in love with it.  It wasn't quite wide enough so I made a pieced panel to put in the middle.  I love how it turned out and the best part was it used up nearly all the scraps and my mistakes from the blocks which I kind of love!
 
 
The quilting was always going to be stippling.  Since I got my longarm machine in July my daughter has always loved the texture of the quilts which I have stippled so it was a no brainer!  But how to do the faces?  I decided that I would quilt over them but ensure I didn't go over the eyes or mouth.  I think it worked well!  Here's a before and after shot to see the difference the quilting makes.


And of course the all important person to impress .....
 

She loved it!!!  It was on her bed before we left for London that day ......

 
And if anyone's still reading(!) here's some full shots I managed to take of the quiltonce I got it off her bed!!


And for the back ....


So that's it.  I've named it Cats & Dogs.  I've been bursting to share it with you since her birthday which was two weeks ago!!  Thank you soooo much Lorna for a wonderful pattern and for hosting the blog hop.  I have loved making this (and I certainly would not have made it so quickly without the blog hop commitment) and loved visiting the other participants who have made such different things from the same pattern.
 
Oh and it's a tick against one of my items on the Finish Along 2015 Q4!!
 
To see some other makes here's the full list of the participants:
 
Tuesday, October 6 Karen of Run Sew Fun
Kris of Kris Loves Fabric
Anja of Anja Quilts
Kelly of Quilting it Out
Tish of Tish’s Adventures in Wonderland

Thursday, October 8
Carol of Just Let Me Quilt
Nina of Inchworming
Doris of The Quilting Queen Online
Brandy of Pampered Pettit
Leena of Creative Instincts

Tuesday, October 13
Ruth of Charly and Ben’s Crafty Corner
Tanya of Tanya Quilts in Colorado
Laurel of Quilts by Laurel
Kathy of Kathy’s Quilting Blog
Deb of New Creative State

Thursday, October 15
Anita of Daydreams of Quilts
Gina of Quilts and Cakes
Beth of Words & Stitches
Rachel of Quiltineering
Julie of Mack and Mable

Tuesday, October 20
Cathy of A Quilting Chick
Selina of Selina Quilts
Shauna of Shauna’s World
Gayle of Pedal Sew Lightly
Kathy of Kayak Quilting

Thursday, October 22
Sandy of Upstairs Hobby Room
Heide of Heide’s Quilty Hugs
Britt-Inger of Hill Valley Quilter
Judy of How ART You?
Louisa of Sewmotion
Tuesday, October 27
Teje of Nero’s Patch and Post
Stephanie of Jak and Will
Valerie of Val’s Quilting Studio
Ellen of Georgia Florida Studio
Cristina of Pretty Little Quilts

Thursday, October 29
Abigail of Cut & Alter
Magdalena of iloveneutrals
Jenn of A Quarter Inch from the Edge
Anne of Batiks by the Bay
Susie of Susie's Sunroom
Tracy of Tracy’s Bits N Pieces


Tuesday, 18 August 2015

This was my guest blogger post over at Very Berry Handamde:

This was the image that got me started on Very Berry’s ATCswaps.  I saw it over on Knotted Cotton.  I had been aware of ATCs before when I helped organised a Quilt Exhibition for my local club in New Zealand.  There was an ATC category and I saw some beautiful pieces of art. 

 
They sounded fun and I wanted to join in.  I kept an eye out and then saw Ali launch the Winter Sparkle ATC swap.  I signed up immediately.  The premise for an Artist Trading Card is simple – produce a piece of fabric art which is the same size as a business card, 3.5” x 2.5”.  The majority of it must be fabric but how you make it and what stitching you do is up to you – patchwork, applique, beading, stitching, crochet, printing – anything goes!  However, the working in miniature was something I found quite challenging.

The card I received in the first swap was this one:


 And the card I made was …. Whoops I was running somewhat late for this one and did not take any photos, either in progress or as a final piece.  I was crocheting a lot at the time so I got some very fine white cotton and a very small crochet hook and crocheted a star.  I placed this on some deep blue fabric and stitched out designs in white and silver with some bead embellishment.  It was supposed to represent the night sky full of stars and frost.  I made it oversized and then trimmed.  I put it together with backing and a thin piece of wadding.  I decided I would sew it bag style and then turn out to neatly top stitch around the edge.  I’m kind of good with things like that and I thought I would get a lovely finish – that’s one of the drawbacks about working in miniature.  I ended up with quite a fat little thing that was rather bulky at the edges!
 
Onwards and upwards to my second swap - Home Sweet Home.  This was the card I received:

 
And this was the card I made (I made sure to take a fair few photos this time!):


The finishing on this one was the more common finish I had seen around and I realise why.  The backing was placed right side down, then a piece of curtain lining with the finish top piece facing up.  I then oversewed the edges with a satin stich.  Or that’s what it would have been if I had been able to do it neatly.  It turned out to be an uneven zig zag/satin stich kind of finish.
 
So for my third attempt – how will I finish it?  I am not quite sure yet.  I think I had better come up with a design and produce a finished top before I worry about the finishing.  Design may sound like I know what I am doing.  When Ali was looking for some people to write about the process she stated:
…….. contribute a blog post on their ATC progress - with maybe sketch plans, work in progress, ideas behind the planned ATC ………
and that made me laugh.  I would describe my process as organic, flexible, on a whim, totally made up …… It takes all sorts doesn’t it?  At least this time I had an idea.  I knew that I was going on an indigo dyeing workshop before the ATC needed to be sent out and blue really is my favourite colour – so I thought that could easily fit into the My Perfect theme.  Because I offered to write this post I have been thinking about it a bit more than previous swaps.  Blue to me is wonderful. Cerulean, azure, turquoise, lapis lazuli, midnight sky, sky blue, aquamarine, cornflower, forget me not, the words are so descriptive and so many shades including the innumerable colours of the sea ……


So I have the starting blocks which are the fabric bits I dyed on the day.  A variety of cotton, linen, vintage, new and yarn all dyed in the same dye bath but all resulting in different shades of indigo.


I have some ideas in my head but I guess once again it will evolve and grow (but not too big I hope) as I actually make it.

Thursday, 30 July 2015

The wind was blowing .....


It was rather windy today so not good shots of the finished bunting hanging on the fence or in the trees!

This was another WIP which I listed in Quarter 3 of the Finish-Along over at On the Windy Side.  The front triangles were cut from a large vintage serviette and the backing is vintage Laura Ashley.  When the sun comes out again it will look lovely hanging in the garden!

NEW WEBSITE LAUNCHED!!

I am so pleased to announce that my new website has been launched.  It's taken me some time to build and it's not all finished yet b...